The Macintosh Classic
Introduction
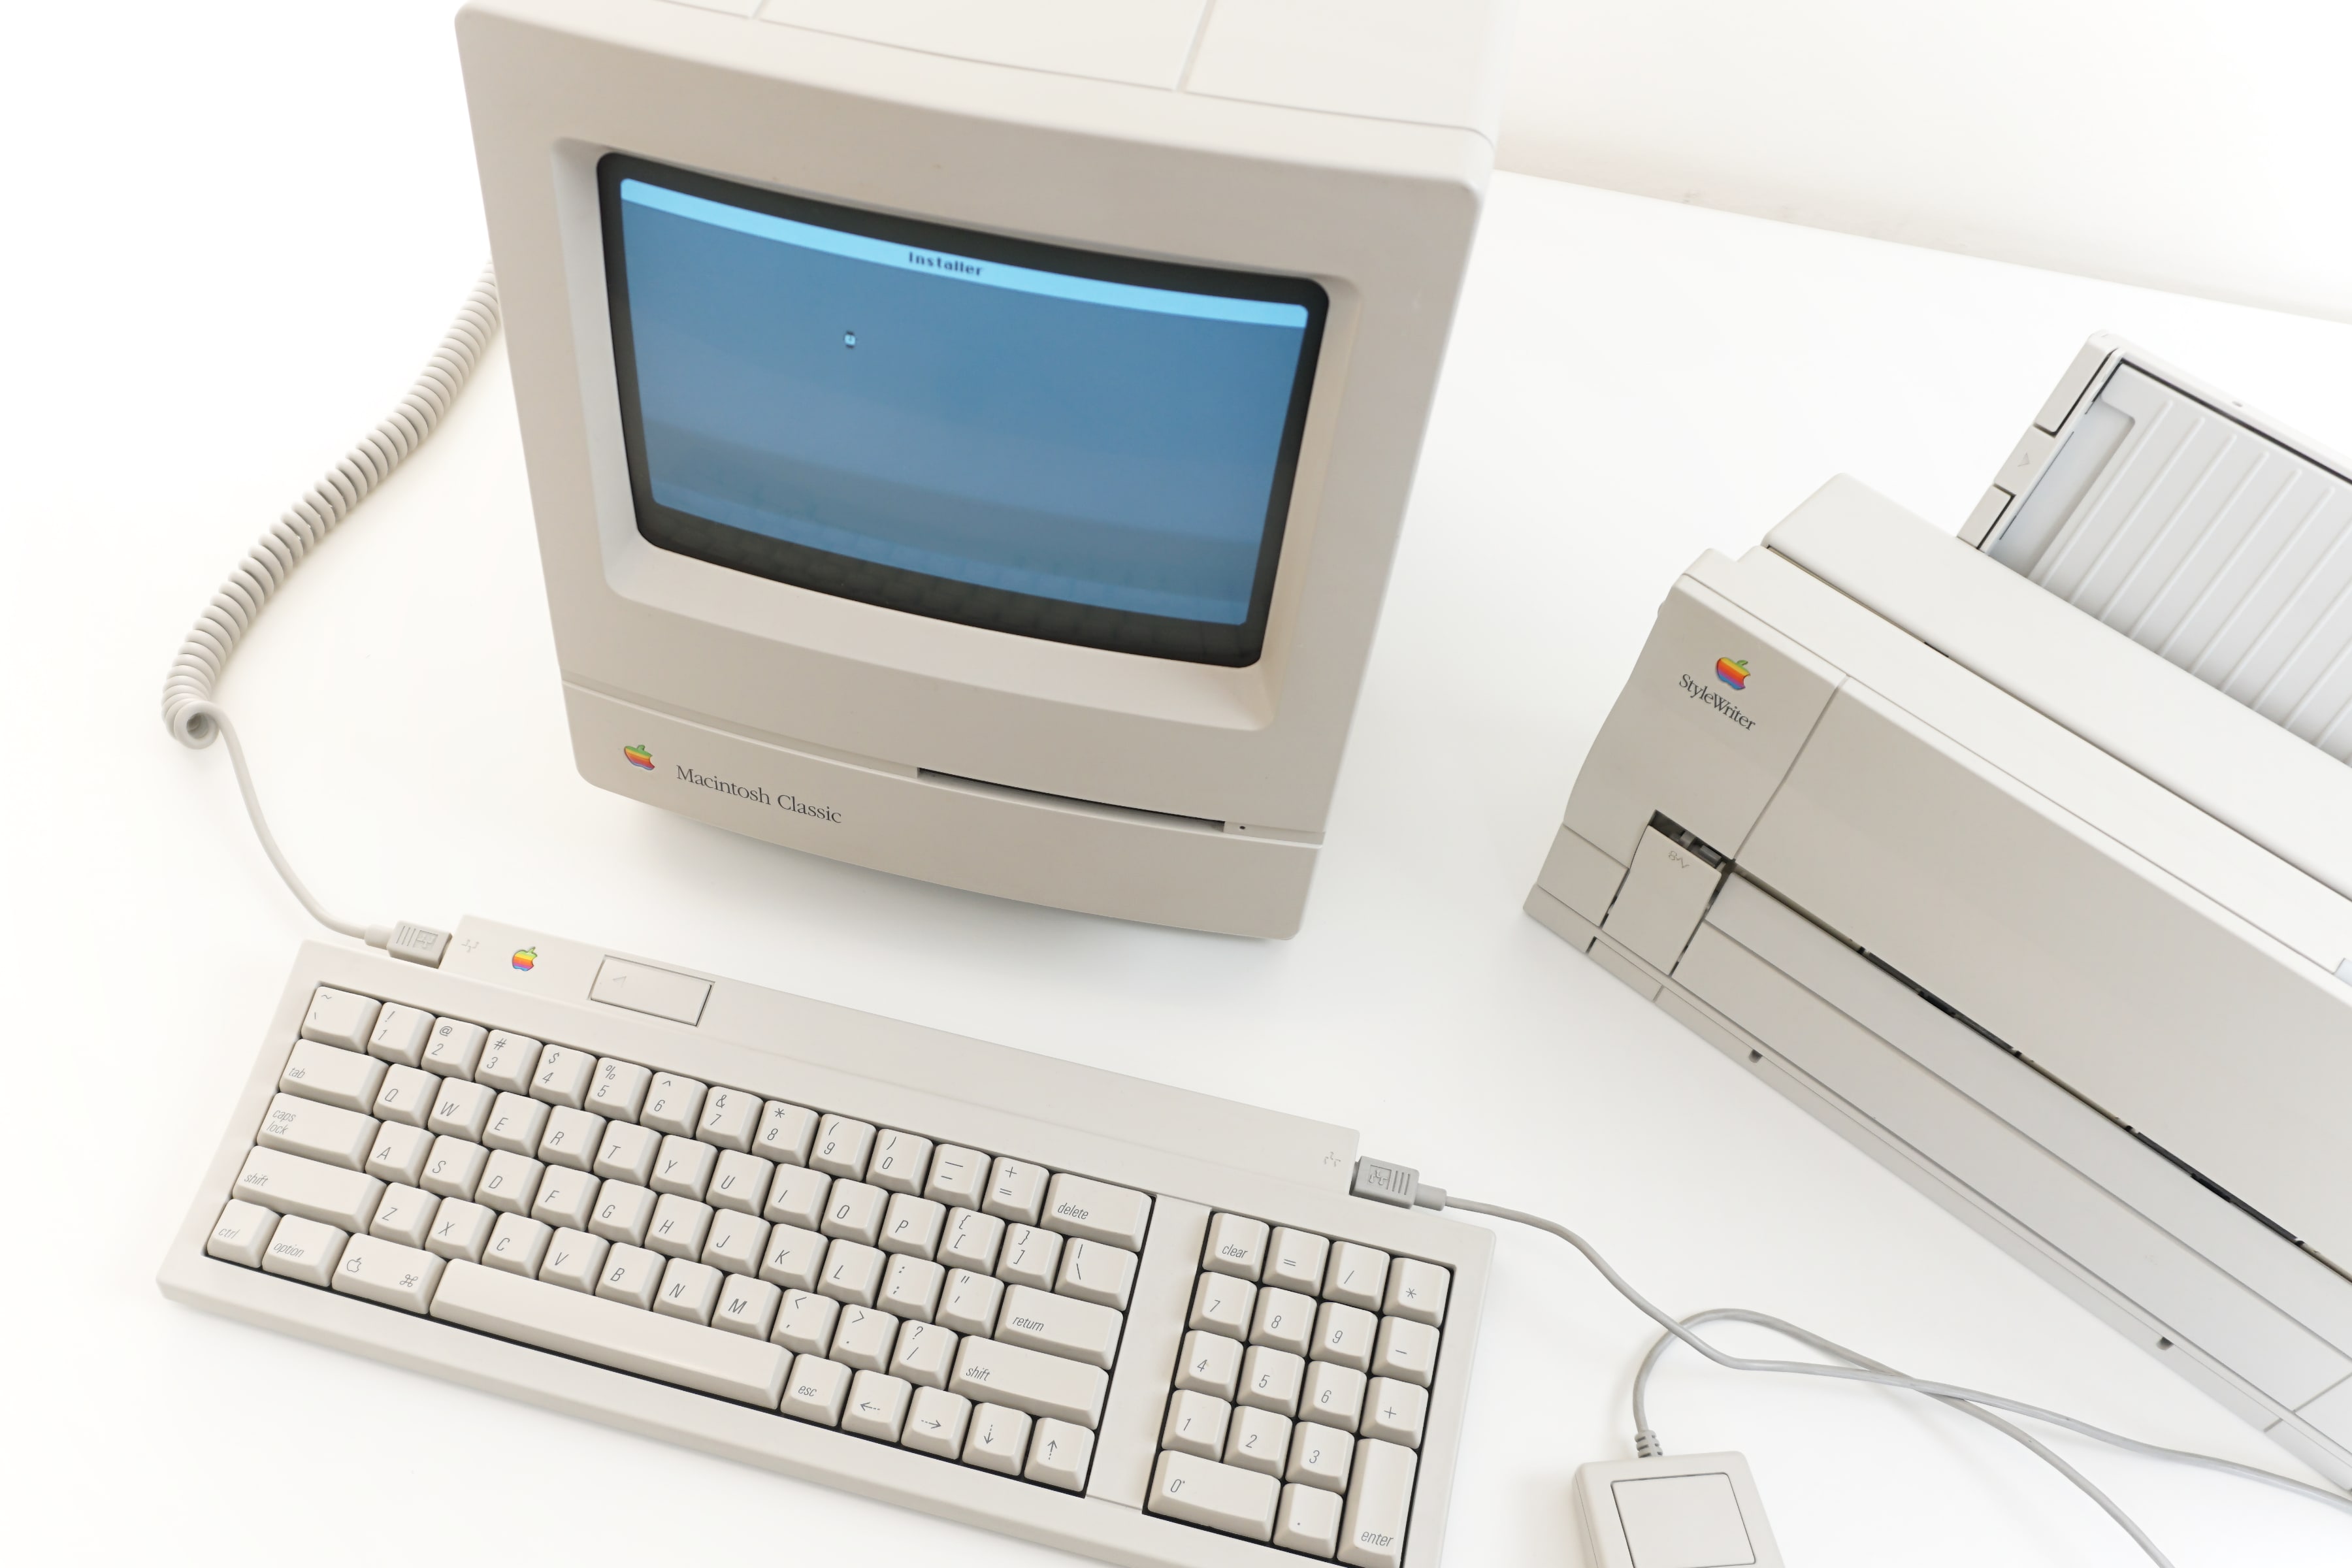
The best-selling Macintosh Classic was not the most advanced computer available in 1990, but it was the one in many people’s homes, college dorm rooms, and classrooms. Macworld itself described the Classic as “nothing to gloat about" — its main innovation was its low price, a feat enabled by its aging processor, black and white screen, and modest capabilities. Money could buy you a faster, more colorful Mac, but for over a million people in the early 1990s, the Classic was their computer, and the things it could do were the things they could do.
The Macintosh Classic holds a special place in my heart. We had several in my elementary school classroom in the mid 90s, and I can still remember playing Oregon Trail and printing out pinfeed banners we made with The Print Shop.
The Classic in these pictures played a different role. It was purchased in mid-1991 at a university bookstore in Austin, TX. In 1991, George H.W. Bush was president, the USSR was still a thing (barely), and the hottest toys were Teenage Mutant Ninja Turtles action figures and New Kids on the Block dolls that included a cassette tape of an interview with your favorite band member.


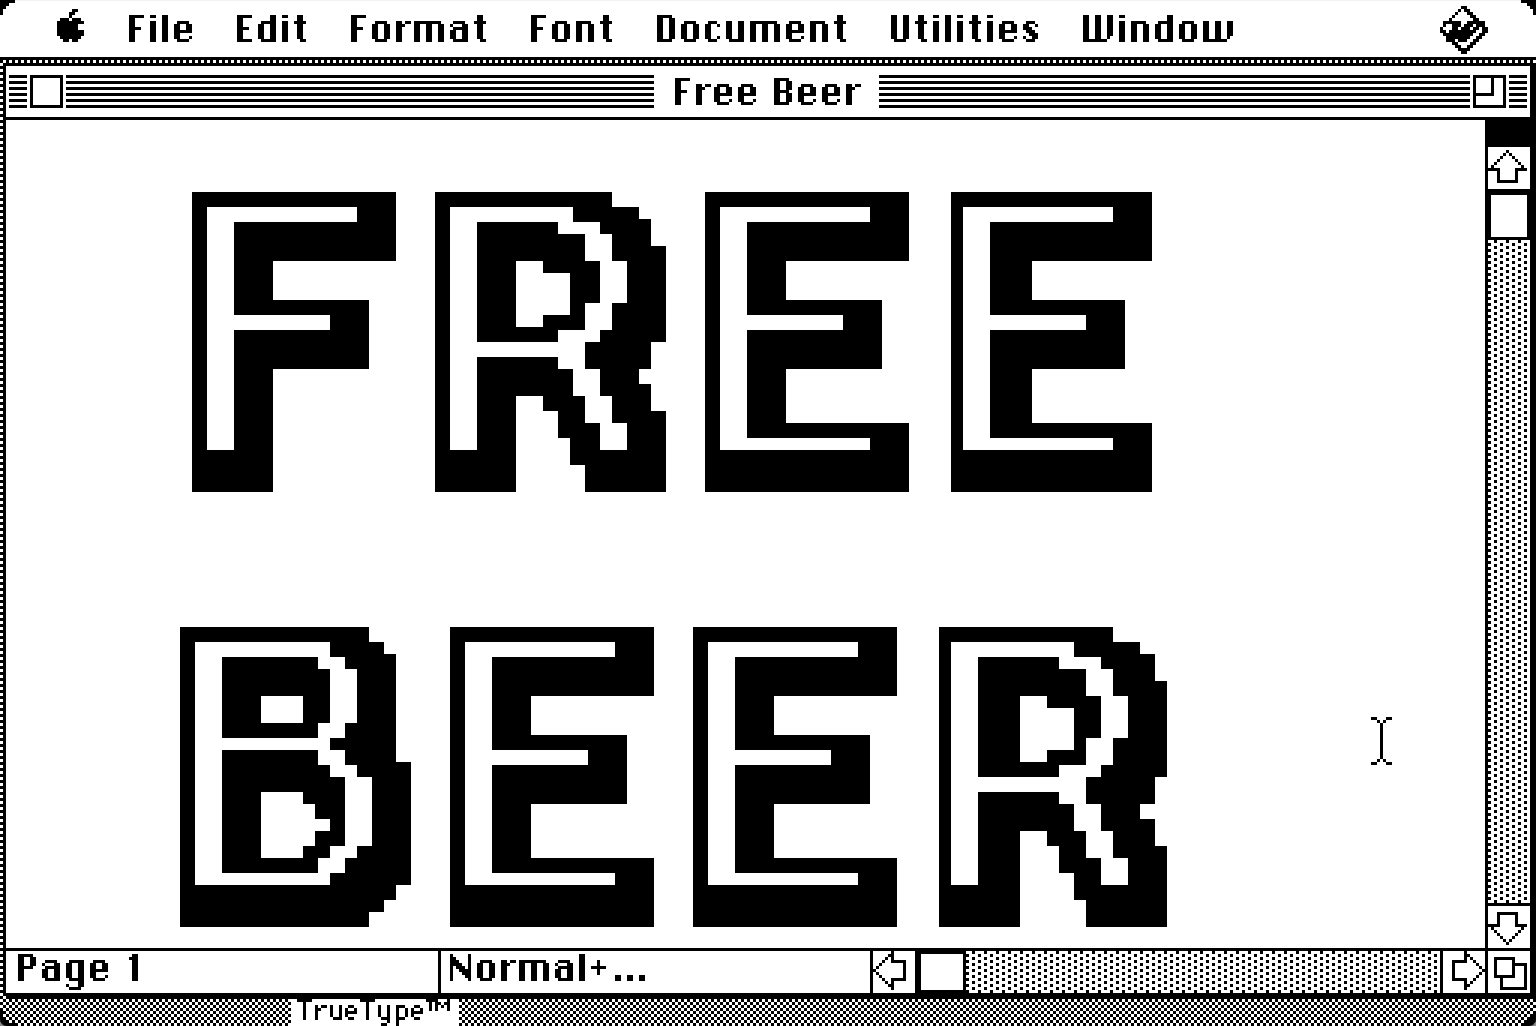
The previous owner of this Classic filled the hard disk with heartfelt letters to friends, training materials for his student job in the university computer lab, and a sign that says, simply, “Free Beer.” He set it so that a dithered, 1-bit frame from Madonna’s “Vogue” music video shows as the computer starts up, alongside an audio clip of Bart Simpson saying “Aww, c’mon I’ll cheer you up.” Why the juxtaposition? Because it was 1991, and it was fun to add custom graphics and sound to your computer.


More than any other computer company, Apple has always stressed that their products are not best understood in kilobytes or megahertz, but in the impact they have on their owners' lives. The story of the Macintosh Classic is both one about the computer itself and the way people used it.
What it was like to own a Macintosh Classic in the early 90s? What could you do with it, and how did it feel to do it?
The System

Accessories


Accessories


Software


History
The Macintosh Classic was introduced in October 1990 alongside the Macintosh LC and IIsi as part of a new generation. This trio was Apple's first push into the low end of the computing market: the Classic was most notable for being the cheapest Mac ever released (the first under $1000), while the LC was the first affordable color Mac.

The new models were both modern and budget-conscious. All three models sported a new industrial design: a gentle curve across the front that replaced the “Snow White” design language used throughout the late 80s. The LC offered a new, matching color monitor, and was available with an Apple IIe emulation card that would help schools transition to Macintosh without leaving their library of Apple II software behind.


The Classic was more focussed on cost savings. It included a redesigned keyboard, the Apple Keyboard II, which lacked some of the crispness of its predecessor, but was $2.50 a unit cheaper to produce. The Classic also used a smaller motherboard that lacked an expansion slot. The expansion slot had been a key feature of the Macintosh SE (“SE” stood for System Expansion) — one of the models the Classic replaced — though an Apple survey found that over 90% of SE owners didn’t use it. While almost certainly done as a cost saving measure, removing the expansion slot was nonetheless also a return to the vision of the original Macintosh, which had adopted a simple, sealed design without slots at the behest of Steve Jobs.
This foray into lower-priced Macs helped balance out the platform. The iconic compact form factor had been consistently available since the original Macintosh was introduced six years earlier, but the late 80s saw Apple expand the lineup upwards with the workstation-class Macintosh II series. The IIfx, released only 6 months before the Classic, had a list price of almost $12,000 (including a color monitor). Even with the steep dealer discounts that were typical of buying a Mac in those days, that IIfx system went for almost $8,000, or over $17,000 in today's money. Buying a computer in 1990 was a much more substantial financial committment than it is today.
The shift toward more affordable Macs was by no means inevitable —there was substantial disagreement among Apple executives about whether to keep Mac prices (and therefore profit margins) high, or to lower them and expand their total market share. Microsoft Windows 3.0 was released in mid-1990, substantially diluting the Mac's lead in user experience, so Apple may have been wary of selling a product that was now less differentiated at the same premium price. In the end, both sides were right — the new, less expensive Classic became the best selling Mac of all time, selling 1.2 million units in its first 18 months. But lower profit margins affected Apple's financials and led to layoffs in 1991.


The choice to offer less expensive Macs fit very well with one of Apple’s historical strongholds — the education market. Since the days of the Apple II, Apple had given steep subsidies to schools, teachers, and students who wanted to buy their own computers. Even in the late 80s, when a Macintosh SE with a hard disk listed for $3300 (almost $8000 today), Apple regularly advertised in the student newspaper at St. Edwards’ University (where our Classic was purchased). After 1990, Apple could offer multiple options for students on different budgets, and they stepped up their advertising accordingly. While the student newspaper also featured ads from other computer brands, not everyone owned a computer in 1990 — an ad for Smith-Corona typewriters appears several pages after the first-ever ad for the Macintosh Classic.


So exactly how affordable were these new Macs? The Classic was at the low end of a Macintosh range that started at $1000 for a full system — roughly where today's Mac lineup starts. But unlike today's low-end models, the Classic's low price was made possible by using years-old technology. The Classic replaced both the Macintosh Plus and the Macintosh SE, models that were 3-4 years old when the Classic was released. While it was a replacement, it wasn’t much of an upgrade — the entry level Classic shared its core specs (8MHz 68000 processor, 1MB of RAM, and no hard disk) with both models, and its processor was unchanged since the original Macintosh in 1984. Benchmarks pegged the Classic's performance at almost exactly the same level as the Macintosh SE (from 1987), albeit for a much lower price. The Classic was a triumph of economy, not of technology.
Even in 1990, 1MB of RAM and no hard disk was a bare bones configuration. Apple’s highly anticipated new operating system, System 7, would need at least 2MB of RAM and a hard disk to run (and even then, just barely). For users who could afford a little more in hopes their Classic would last a few years, Apple offered a second, better configuration: the same processor, 2MB of RAM, and a 40MB hard disk for a list price of $1499 (over $3,300 today).

It is this configuration that our Classic’s previous owner brought home from the St. Edwards student bookstore in July of 1991.
Specifications


| Processor | Motorola 68000, 8MHz |
| RAM |
1MB or 2MB standard
Expandable to 4MB by adding 30-pin, 120ns SIMMs to an internal memory expansion card |
| Hard disk | No hard disk or 40MB SCSI hard disk |
| Floppy disk | 1.44MB 3.5” SuperDrive |
| Display | 9” monochrome display, 512x342 resolution |
| Expansion slots | None |
| Ports |
|
| System Software | System 6.0.7 |
| Dimensions | 13.2” (H) x 9.7” (W) x 11.2” (D) |
| Weight | 16lbs. |
| Price | $999 or $1499 |
Unboxing & Setup

The Classic and Apple’s most student-friendly printer — the StyleWriter — shipped in matching boxes, with additional boxes for the StyleWriter Accessory Kit as well as any third-party software.
This style of Apple packaging — white boxes with dithered product photos and red/gray text — was used from the introduction of the Macintosh SE in 1987 until they switched to brown boxes with white typography in 1992.
The Classic box opens to reveal a styrofoam tray that holds the keyboard, mouse, cables, and documentation. Below that is the Classic system unit itself.


In the box
| Macintosh Classic system unit | M1420 |
| Apple Keyboard II | M0487 |
| Apple Desktop Bus Mouse | G5431 |
| ADB keyboard cable | 590-0361-B |
| Power cord | |
| Welcome folio | 914-0247-A |
| System Startup (Disk)Version 6.0.7 | 690-5731-A |
| System Additions (Disk)Version 6.0.7 | 690-5732-A |
| Macintosh Basics disk holder | 914-1045-A |
| Macintosh Basics (Disk) | 690-5820-A |
| Using Your Macintosh Classic (Manual) | 030-3565-A |
| HyperCard Basics (Manual) | 030-3498-A |
| HyperCard Program (Disk)Version 2.0 | 690-5640-A |
| Registration card | |
| Software license card | 001-0124-A |
| Warranty card | 030-3926-A |
| Customer assistance card | 030-3552-A |
| Packing list | 030-3566-A |
| Apple stickers | |
|
System 7 Upgrade Offer card
Attached to outside of shipping box | 031-1049-A |
Setup

Step 1
Connect the power cable.

Step 2
Connect the mouse. The mouse can be
attached to either side of the keyboard; you will probably want to
use the mouse with whichever hand you use to write.

Step 3
Connect the keyboard cable to the
other side of the keyboard. The end closest to the spirals should
attach to the keyboard.

Step 4
Connect the other end of the keyboard
cable to the ADB port on the back of the Macintosh Classic.

Step 5
Flip the power switch on the back of
the Macintosh.
System 6

Classic owners flipping the switch for the first time were greeted with a soft beep, the happy Mac icon, and a message that simply said “Welcome to Macintosh.” Although this was unchanged since the original Macintosh, it was no less unique in 1991 than it had been in 1984. In contrast to almost every other computer system of the day, the Mac was full of graphics, sound, and personality from the start.
A brand new Classic’s hard disk wouldn’t have had much on it. Today, we’re used buying devices with a wealth of pre-installed applications for managing photos, watching videos, and creating documents — not to mention accessing the entire Internet. In 1990, you needed to be intentional about what you were going to use your computer for, and you’d usually need to buy hundreds of dollars of separate software to do it. Everything on your computer you either created yourself or got off a floppy disk. Beyond buying retail software (which came on floppies), you might get shareware apps from a local Macintosh user group, or trade fun pictures and sounds with friends, but this happened over weeks and years. Instant access to apps, GIFs, and PDFs others had made simply didn’t exist.
Hooking up your computer to the outside world wasn’t completely unknown in 1990 — companies and universities may have provided email service, and the Classic supported Apple’s LocalTalk technology for sharing files or printers with other computers in your building. But the Internet as we know it was not part of anyone’s daily experience. When the Classic was introduced, Tim Berners-Lee had just proposed the the World Wide Web (as a research project) and the first web servers came online a few months later. Widespread adoption, including computers that could easily access the Web and web startups like Yahoo! and Amazon, wouldn’t come until years later.
Daily Use
Starting up your Classic on a daily basis, you’d end up in System 6’s Finder. The Finder was the core of the Macintosh experience — showing the menu bar and Desktop, as well as any windows (containing folders, documents, and applications) you’d opened. Menus (File, Edit, View, Special) provided options for working with files, disks, and the computer itself. The Apple menu, to the far left, showed a list of mini-apps called desk accessories. The Desktop had icons for the hard disk and any disks inserted in the Classic, the trash, as well as any files the user had moved to the Desktop for easy access.

Opening applications (like TeachText or HyperCard, two that were included on the Classic's hard disk) would replace the Finder until you quit the application — by default, there was no switching between the windows of different applications like we’re used to today. However, users could enable MultiFinder (via the “Set Startup” option in the Special menu) which would allow running multiple applications (including the Finder) at once. Users could switch applications using an icon in the top right corner of the screen, or a list within the Apple menu. (In System 7, these would be combined into the Application menu in the top right corner.)


Desk Accessories, like Calculator or Scrapbook, were small, single-window applications that were accessible via the Apple menu from within other applications. Before MultiFinder, this enabled multi-tasking without the cumbersome process of quitting one application, opening a second one to do something simple, and relaunching the first one. Desk accessories were stored inside the System file (they were not visible in the Finder) and could only be added and removed using a special utility called Font/DA Mover, included on the “System Additions” disk. Desk accessories disappeared in System 7, since multi-tasking was built in.
Learning
Apple couldn’t assume that anyone who bought a Macintosh Classic would know how to use it, no matter how friendly and intuitive the Mac was. Computers in 1990 took some learning: concepts like clicking applications to open them, dragging windows around, or even using the mouse at all were new to many people. What’s more, users needed to understand things we barely think about today — saving files, copying them from one (physical) disk to another, and making sure the proper font formats were installed before you printed them.
To help bridge the gap between users who had never seen a mouse before and a productive life with their Macintosh Classic, Apple developed a tutorial called Macintosh Basics and included it with every machine.

Starting up from Macintosh Basics replaced the typical Finder experience with full screen lessons hosted by a black and white guy wearing an Apple sweatshirt. Lessons started with the easy stuff: how to hold the mouse, dragging an illustration of a piece of paper into a filing cabinet, and clicking on a container of food to feed an animated goldfish.


After moving on to more practical skills like opening applications, adding text to documents, and saving them to your hard disk, the lessons concluded by telling you to seek more help in the manuals included with the Classic.


Notably, even double-clicking was seen as too advanced for these lessons — opening applications was done by selecting them with a single click, and choosing “Open” from the File menu.
Personalization
Managing documents and opening applications were the bread and butter of daily usage, but the Mac had a quirky, fun side as well. There was a rich community of creative or downright silly customizations that enhanced the Mac’s personality and made it feel like a computer that did things the way you wanted.
A base level of these customizations were built into the system itself — the Control Panel allowed users to draw their own 8x8 pixel desktop pattern, or choose between four different alert sounds (from the straightforward “Simple Beep,” to the more whimsical “Monkey”). A power user trick allowed users to customize the screen that showed while the Mac was starting up by naming an image “StartupScreen” and putting it in the System Folder.


But many more customizations were small apps that sold for cheap, or were shareware written by hobbyists and passed between friends. One utility installed on our Classic allowed sounds to be played on startup. Combined with a StartupScreen, our Classic owner got to experience Madonna, Bart Simpson, and the “Hallelujah!” chorus before his Mac had even finished starting up.

These utilities were often INITs or CDEVs (known as Extensions and Control Panels, respectively in later versions of the system software) — files you could add to your System Folder that would load when the Mac started up. Some were all business — the TrueType INIT enabled new font technology, and the Disinfectant INIT scanned for viruses. Others were fun — changing the way your cursor behaved, or showing an animated Oscar the Grouch living in the Trash on your desktop.
Microsoft Word
“Letter and report writing, basic information management, simple graphics, and electronic mail” — that’s the list of uses Macworld recommended for the Classic in its initial review in December, 1990. For many Classic users, word processing was inarguably their most common task, and no word processor loomed as large as Microsoft Word. It was a perennial #1 on Macworld’s Best Sellers chart and got 62% of the vote in a 1991 reader survey on the best software in each category. A screenshot of Word 4.0 was even featured alongside the Classic in a 1990 Apple brochure.


Microsoft Word (and a printer) could replace your typewriter, but it also opened up an entire world of visual expression. Fonts in different styles, tables, and graphics allowed Microsoft Word users to create things they simply couldn’t have before.
Despite being an app most Macintosh users couldn’t live without, Microsoft Word wasn’t cheap — it sold for around $240 ($550 in today’s dollars). Like many software vendors, Microsoft offered academic versions like this one for students and teachers at a steep discount. These versions were often only available at university bookstores, and required student ID for purchase.
Installation
Microsoft Word 4.0 was first released in 1989, and was still the latest version when our Classic was purchased in 1991. Although most new Macs shipped with hard disks, the days of running applications directly from floppy disks weren’t long past. Microsoft Word 4.0 came on three disks: Program, Utilities 1, and Utilities 2. Rather than provide an Installer app, “installation” consisted of dragging the appropriate files to the disk (a hard disk in our case) you wanted to run Word from.


Workspace
The default workspace is surprisingly minimalist: not much more than a blinking cursor in the middle of a blank white screen. There are no formatting controls, rulers, or toolbars showing by default — especially surprising given that Microsoft Word became notorious for having a large number of toolbars in later versions.


The default window is just the right width for a page’s worth of text (about 6in at the Mac’s traditional conversion of 72px to 1 inch). Working with non-traditional documents (like the price list in landscape orientation shown above) requires scrolling to see the entire document, which makes the screen feel very limited. Word processors in later years would show the outline of a page to help authors better visualize their printed documents, but the Classic’s small screen doesn’t have room for anything other than the text itself.
Despite the simplicity of the workspace, there is no shortage of included features. Due to both the screen size and the potentially overwhelming number of commands and options, most are hidden by default. Enabling “Full Menus” pads the menu with more features, while even more can be added via the “Commands” window. This allows full customization — power users can be very specific about which features they’ll use most often and where they should appear.


Editing Documents
For most people, word processing was as simple as opening Word and getting to work on the letter or school paper they were writing. No fancy formatting or commands were necessary.
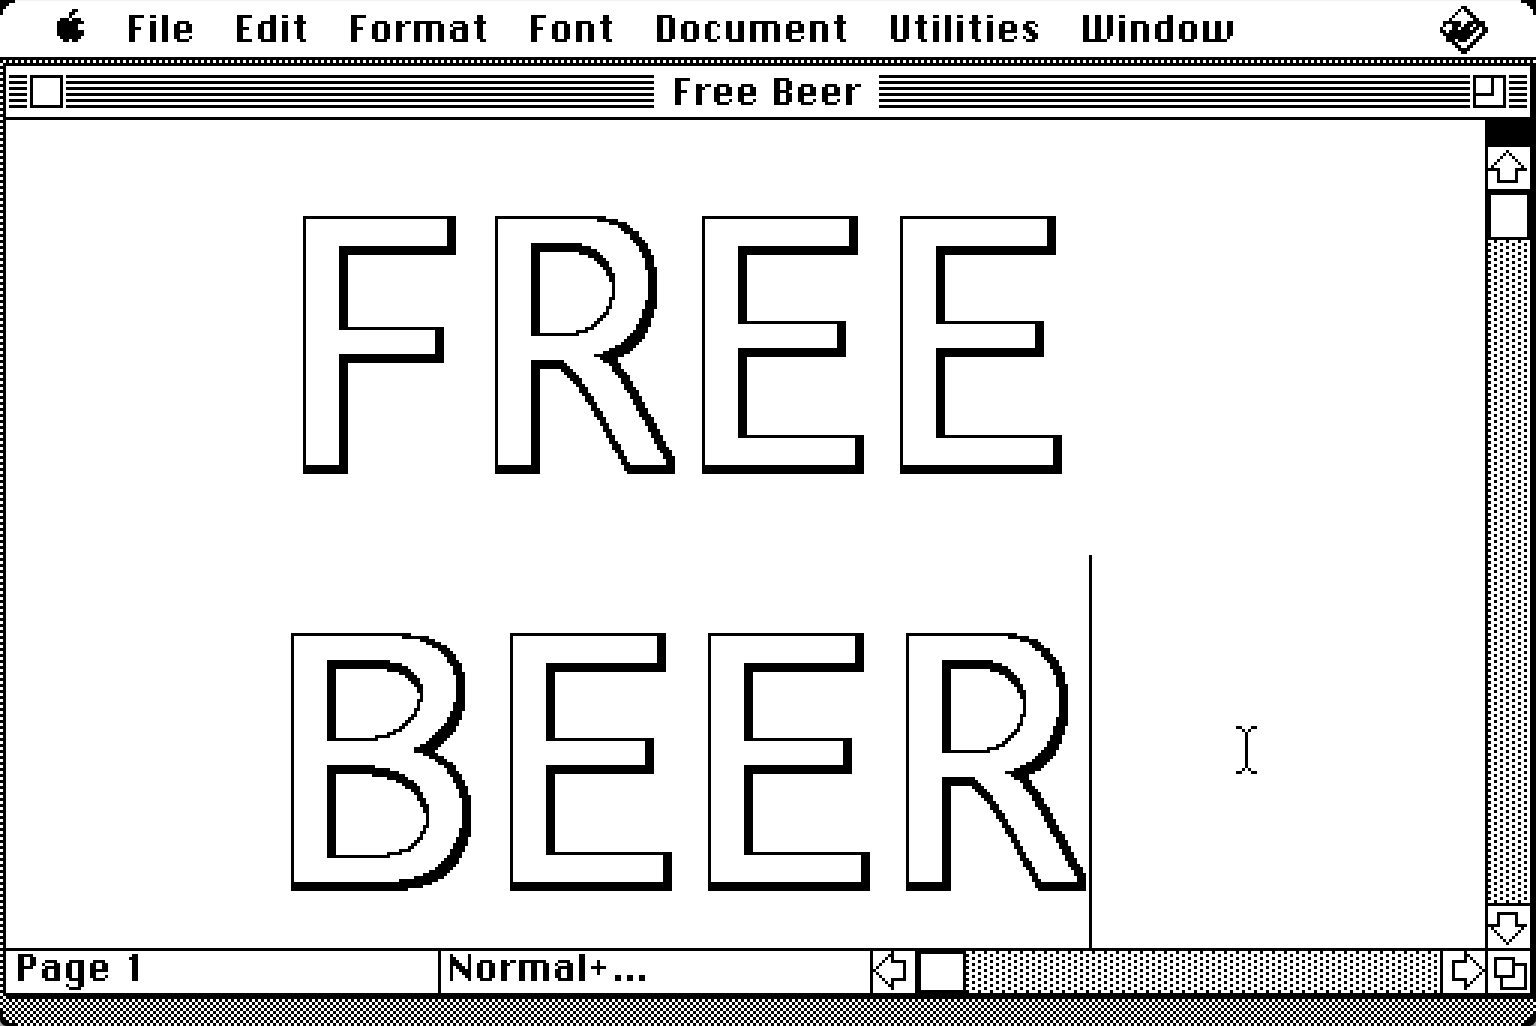
Probably the most accessible customization — and an easy way to distinguish writing on your Classic from both typewriters and less graphical systems — was the ability to change fonts and styles. In a world before digital photography, emojis, or even color screens, fonts were the easiest way to add personality and graphical flourish to your documents. The Mac came with a variety of fonts (many of them designed by Susan Kare for the original Macintosh), and each could be dressed up with five different style options. By today’s standards the fonts look blocky and the styles (particularly outline and shadow) look crude. Nonetheless, due to the prevalence of word processing (and the high cost of professional typesetting) in the early 90s, these Macintosh-specific font styles created an entire aesthetic often seen in both business and personal life.

Included on one of the Utilities disks is SuperPaint, a simple painting program that let users add graphics to their documents as well. More complex features — adding structure to documents using Tables, or even including PostScript markup directly in your document (which would be interpreted by your PostScript printer, if you had one), are demonstrated in a small set of sample documents included on the disks.

While writing a simple letter on the Classic was a relatively smooth process, more complex documents quickly made the Classic’s performance limitations clear. Macworld’s review caveated that you might consider upgrading to a more powerful Mac “if you write lengthy documents.” While today we wouldn’t think twice about the length of a text document or PDF, it’s clear just from scrolling a document that work on a computer got done a little more slowly for Classic users in 1990.
Printing
Before the internet, creating documents on your computer wasn’t much use unless you could print them out.
The StyleWriter was introduced in 1991 as Apple’s first inkjet printer. It listed for $599 (over $1300 in today’s dollars), or about what Apple’s most affordable printer, the ImageWriter II, cost. Although the dot-matrix ImageWriter would be sold through the mid-90s, the StyleWriter represented a major leap forward in size, noise, and print quality. With a resolution of 360dpi, it was even technically higher resolution than Apple’s flagship 300dpi LaserWriter series. However in practice, the LaserWriter (which started at almost $3000 in today’s dollars) produced much higher quality output, due to inherent differences between laser and inkjet technology.


Unboxing

The StyleWriter came in two boxes: one for the printer itself, and a second for the Accessory Kit — cables, software, and the like. Apple had previously used this separation for products that needed different cabling or software for different platforms (notably the Imagewriter, which used different cables for the Apple IIe, IIc, and Macintosh), although only the single variety was ever offered for the StyleWriter.


Within the main box, the StyleWriter unit itself is split in two: the printer unit latches onto a separate cut sheet feeder. Although this may have been a weak nod to portability (you can use the StyleWriter without the sheet feeder, although it’s an awkward shape to slip into a bag), it is more likely a vestige of the StyleWriter’s heritage as a rebadged Canon BubbleJet BJ-10e.


In the box


StyleWriter box
| Apple StyleWriter main unit | M8000 |
| Apple StyleWriter cut sheet feeder | M8000 |
| Black ink cartridge | 8041G/C |
| Paper support | |
| Packing list | 030-5119-A |
| Ink handling notice | Q-IM-416 |
StyleWriter Accessory Kit
| StyleWriter Power Adapter | M8010 |
| Apple Peripheral-8 Cable | 590-0552-A |
| Disks | |
| StyleWriter Installation Disk 1 Version 1.2 | 690-5677-C |
| Printer Software Disk 2 Version 1.2 | 691-0042-A |
| Printer Software Disk 3 Version 1.2 | 691-0043-A |
| Printer Software Disk 4 Version 1.2 | 691-0044-A |
| StyleWriter Owner's Guide | 030-5116-A |
| Read This First: Important Installation Instructions (Manual) | 031-1000-A |
| Getting Started with TrueType (Manual) | 031-0099-A |
| Promotional offer cards | |
| Bitstream TrueType promotional card | 031-0550-A |
| Monotype TrueType promotional card | 031-0551-A |
| Casady & Greene TrueType promotional card | 031-0552-A |
| Software license sheet | 001-0100-D |
| Warranty card | 030-3926-A |
| Customer assistance card | 030-3552-A |
| Packing list | 030-5115-B |
Setup


Step 1
Latch the StyleWriter to the cut
sheet feeder.

Step 2
Connect the smaller end of the
StyleWriter AC Adapter to the power port on the back of the
StyleWriter.

Step 3
Plug the other end of the AC Adapter
into the wall.

Step 4
Connect one end of the Peripheral-8
cable to the serial port on the back of the StyleWriter. Both ends
are identical.

Step 5
Connect the other end of the
Peripheral-8 cable to the Printer port on the back of the Classic.
The Modem port is very similar; you can use it if you are using
the Printer port for something else.

Step 6
Install the ink cartridge. Open the
front cover, lift the cartridge release lever, insert the ink
cartridge, and close the release lever and front cover.

Step 7
Insert the paper support into the top
of the printer.

Step 8
Load the paper: press down on the
pressure plate, insert paper, then press the plate release button
to lock the paper into the feeder.

Step 9
Press the power button to turn the
printer on.
Software Installation
The StyleWriter software comes on four disks and consists of:
- the StyleWriter driver (to be selected in the Chooser)
- the TrueType INIT, which allowed System 6 to use TrueType fonts
- TrueType replacements for existing system fonts (Chicago, Geneva, Monaco, New York)
- new TrueType fonts (Avant Garde, Bookman, Courier, Helvetica, Helvetica Narrow, New Century Schoolbook, Palatino, Symbol, Times, Zapf Chancery, Zapf Dingbats)
- a new version of Font/DA Mover, compatible with TrueType fonts
- an Image Utility, for converting 300dpi images to the StyleWriter’s native resolution of 360dpi
- Backgrounder and PrintMonitor, which allowed you to continue to use the computer during printing (if you had enough RAM)
Once the software is installed, the StyleWriter can be selected as the active printer connected to either the Modem or Printer port, and background printing can be enabled or disabled.


TrueType
Beyond the inkjet technology itself (which Apple licensed from Canon), the StyleWriter’s biggest innovation was a new font technology called TrueType.

The fonts included with the original Macintosh in 1984 were bitmapped fonts: every character was drawn as a set of pixels. Each typeface had a different font file for each character size (9pt, 12pt, 18pt, et cetera), each with a different set of pixel drawings of every character. This made the fonts very easy for the Mac to draw alongside all of the other pixels on screen, but it ended up looking blocky when printed: the human eye isn’t used to individual pixels on the printed page.
The introduction of the LaserWriter in 1985 included a font technology from Adobe called PostScript. Rather than representing fonts as pixel art, PostScript uses vector equations to describe the shape of each character. Powerful printers like the LaserWriter could do math to scale those equations to any size, resulting in very sharp printed output. But that math was too cumbersome for early Macs considering how many characters are often on screen at once. So many PostScript fonts had two parts: a screen font with the pixel version for your Mac, and an outline font with the equations for your printer.
The desktop publishing industry made this work in the late 80s — some of the complexity was eased by a program called Adobe Type Manager, which could generate screen fonts directly from PostScript outline fonts — but it was both tacked on top of the Macintosh system and expensive. Adobe Type Manager, special fonts, and especially printers with enough horsepower to interpret PostScript all cost money.
Apple invented TrueType to ease this problem: the font files would include both the equations necessary for high-resolution printing, and more advanced information (called “hints”) about how to easily translate those equations into pixels (either low resolution pixels to display on screen, or high resolution pixels for printing). This allowed the StyleWriter to have very limited processing power while still producing high-resolution output: all of the processing would be done by the Mac it was connected to.
The improvements TrueType enabled are familiar today — it is unlikely that anyone who does much printing today has heard of screen fonts as distinct from printer fonts. Microsoft later adopted TrueType for use in Windows, cementing it as one of the dominant font technologies — it’s still in use.
Printing

The most notable thing about printing with the StyleWriter is that it is slow. This is a direct side effect of TrueType’s reliance on the host computer to do all the processing, so particularly with a slower machine like the Classic, printing a simple document can take full minutes.
The slowness wasn’t the only con called out by early reviews. Inkjet technology made pages much more likely to smudge — a pitfall unfamiliar to people who had used dot-matrix or laser printers.The bottom tray of the sheet feeder has an elaborate fold out mechanism to catch printed pages and keep them elevated while they dry.

HyperCard


Although word processing was massively popular, the resulting content was almost always consumed outside of the computer. Before the rise of the world wide web helped the development of standard formats like HTML and PDF, it was rare to make something on your computer that you expected other people to be able to open and use on their computers. Professional software developers could write and compile software that would run on Macs or Windows machines, but that was out of reach for most people.

HyperCard aimed to change all of that. It was simple enough to be used like a word processor: add text and graphics to a canvas. But the result was something you used on your computer and felt computer-y — a simple application that users could add data to, and navigate around with buttons and logic. HyperCard was also an easy entry point for multimedia — Macworld's review of the Classic suggested using it for “HyperCard productions, including those that use CD-ROM, CD audio, or videodiscs.” Although a CD-ROM (let alone a LaserDisc player) was probably a rare accessory for a low-end machine like the Classic, HyperCard was the perfect tool for teachers and others to make interactive educational stacks that included pictures or audio. Several years later, the best-selling CD-ROM game Myst (which allowed users to navigate through a world by clicking on different parts of the scene) was developed using HyperCard.
Of course, to allow regular Macintosh users to create their own applications, Apple had to boil down the process of programming into simpler concepts. An application created with HyperCard was called a “stack,” because it consisted of a set of “cards” — the individual screens that the user would interact with. The stack of cards had an order that users could flip through, but the creator of the stack could easily add buttons to jump from one card to another — related information or another part of the app entirely.
For a few years, a full version of HyperCard was included for free with every Mac. By 1990, however, the included version could only run existing HyperCard stacks — creating them required buying the HyperCard Development Kit from Claris (Apple's on-again, off-again software division).


Much of the HyperCard experience is itself a HyperCard stack — launching the application opens the “Home” stack which includes links to sample apps and help content (both in other stacks). Making a new stack results in a surprisingly blank canvas: a full screen of white, ready for whatever app you want to create.


Adding to the cards in your stack is done by selecting from the Tools menu. The card functions like the canvas in a painting app — once you put text down in a certain font and style, it's fixed and uneditable. You can use the marquee tool to select parts of your text (or painting) and move it around, but it‘s relatively unforgiving by modern standards.
The real power comes with the interactive tools: fields and buttons. Simple buttons can be added, styled, and linked to other cards or stacks. Their power only expands from there — although HyperCard is accessible to those who can't code, those who want more advanced functionality can write scripts in a language called HyperTalk.


Conclusion
Every day in the early 90s, millions of students, teachers, and adults sat down at a Macintosh Classic and got to work — or play. They forged paths on the Oregon Trail, wrote term papers, painted silly (or serious) pictures, and maybe even made their first programs using HyperCard. They saved those programs to floppy disks, and handed in printed copies of those term papers to their teachers.

The Classic did not win many awards. In 1991, only 7% of Macworld's readers voted it "Best Hardware Newcomer" — it‘s stablemates the LC and IIsi each got almost double the votes. And yet, for many of the people who used one, it was friendly and fun. From the happy Mac icon and custom sound effects, to the experience of writing a letter without a typewriter, or being able to play a computer game at all, the Macintosh Classic gave them the power to be their best.

Looking Inside


Capacitor list
Macintosh Classic Logic Board630-0390-A
| Quan. | Board Location(s) | Cap. | Voltage | Type | Diam. | Lead Spacing |
| 7x | C1, C2, C4, C5, C6, C8, C9 | 47uF | 16V | SMD | D Case | |
| 1x | C3 | 1uF | 50V | SMD | C Case |
Equivalent tantalum capacitor case size listed. Using tantalum capacitors with a higher voltage rating (25V instead of 16V, for example) is recommended.
Macintosh Classic Analog Board630-0525-8
Only large capacitors that frequently need replacing are listed
| Quan. | Board Location(s) | Cap. | Voltage | Type | Diam. | Lead Spacing |
| 3x | CF4, CP9, CP10 | 470uF | 25V | Radial | 10mm | 5mm |
| 1x | CP2 | 470uF | 50V | Radial | 12mm | 5mm |
| 2x | CF3, CP12 | 1000uF | 16V | Radial | 10mm | 5mm |
| 1x | CP7 | 1000uF | 10V | Radial | 10mm | 5mm |
| 1x | CP8 | 2200uF | 16V | Radial | 12mm | 5mm |
| 2x | CP6, CP36 | 2200uF | 10V | Radial | 15mm | 5mm |
StyleWriter Logic BoardRev. A, QG2-5053
Only large capacitors that frequently need replacing are listed
| Quan. | Board Location(s) | Cap. | Voltage | Type | Diam. | Lead Spacing |
| 1x | C10 | 1000uF | 25V | Radial | 12mm | 5mm |
| 1x | C11 | 2200uF | 35V | Radial | 18mm | 8mm |
| 2x | C2, C3 | 3300uF | 25V | Radial | 18mm | 8mm |